Judy L's UFO Challenge

Saturday, August 29, 2015

Avante

Guess who came to stay!  I think I'm going to name her Trudi after the lady that sent me on the journey that led me to making this purchase.

Without further ado....here's Trudi!


Happy quilting!

Swooze

Friday, August 28, 2015

Watch This Space

Exciting things are coming my way!

Hugs!

Swooze

Wednesday, August 26, 2015

Elna Grasshopper

got a new toy.  I first saw this machine on Bonnie Hunter's blog.  She loves her vintage machines!  This machine was made in Switzerland.  Did you know I spent a college semester there?  I felt a connection to this cute little machine.

I have been watching these on eBay.  This one popped up and had its little accessory box.  There are no extra feet but I can worry about that later.  Right now I need to learn to set it up and use it.

This machines case folds out into a table.  There is a part that needs to fold somehow so it lies flat.  Once I get that I will need to thread it and give her a test drive.  Except for the frayed electrical cord she's in great shape.

Here are some pics.


More later!

Wednesday, August 12, 2015

T-shirt Quilt Revisited

I washed and dried the quilt and threw it on my daughter, in her bed.  She pulled it up on her and snuggled in for a longer sleep.  She must have been waking up and petting her quilt because not long after I heard her stirring she called out....."Mom, there's a hole in my quilt".

I went in to see what she was talking about.  Of course my heart sank.  What I discovered was two places where I had either missed the edge of the fabric or the thread failed me or who knows that.  I had gaps in the seam.  Something more highly surmountable than a hole in my opinion.

Here is what I saw.


My immediate thought is how do I fix this without making it look like it was fixed.  Whipstitching and top stitching would only enhance the fact that I had to do something to the quilt.  Not how I wanted to start out with this quilt.

I put a call out on the yahoo group Stashbuster and the Facebook group Quilting.  I had several suggestions.  The two that caught my interest were permanent fabric glue and ladder stitching.  Assuming I had enough of an edge on the fabric the ladder stitch should work.  On closer inspection it looked like the blue section would be fine and the red section would be close.  I went for it!  I ladder stitched.  Here is the result.


I think I got a good result and I learned a lesson.  I will be inspecting my seams a little more closely before the quilting!

Tuesday, August 11, 2015

Super Sized Nine Patch

I made three of these little gems several years back.  A year or two ago my friend Laurie quilted them all for me.  I made binding for all of them several weeks ago and attached it to one of them.  I was experimenting with machine binding the quilt.  I made good progress but never good enough to satisfy me.  I will try again in the future but for now I hand tacked the binding to the back.  It was a nice little travelling project.  I will be binding the other two over the coming weeks between other things.

This is a McCalls pattern and the pattern can be found here.


Monday, August 10, 2015

T-shirt Quilt Finished

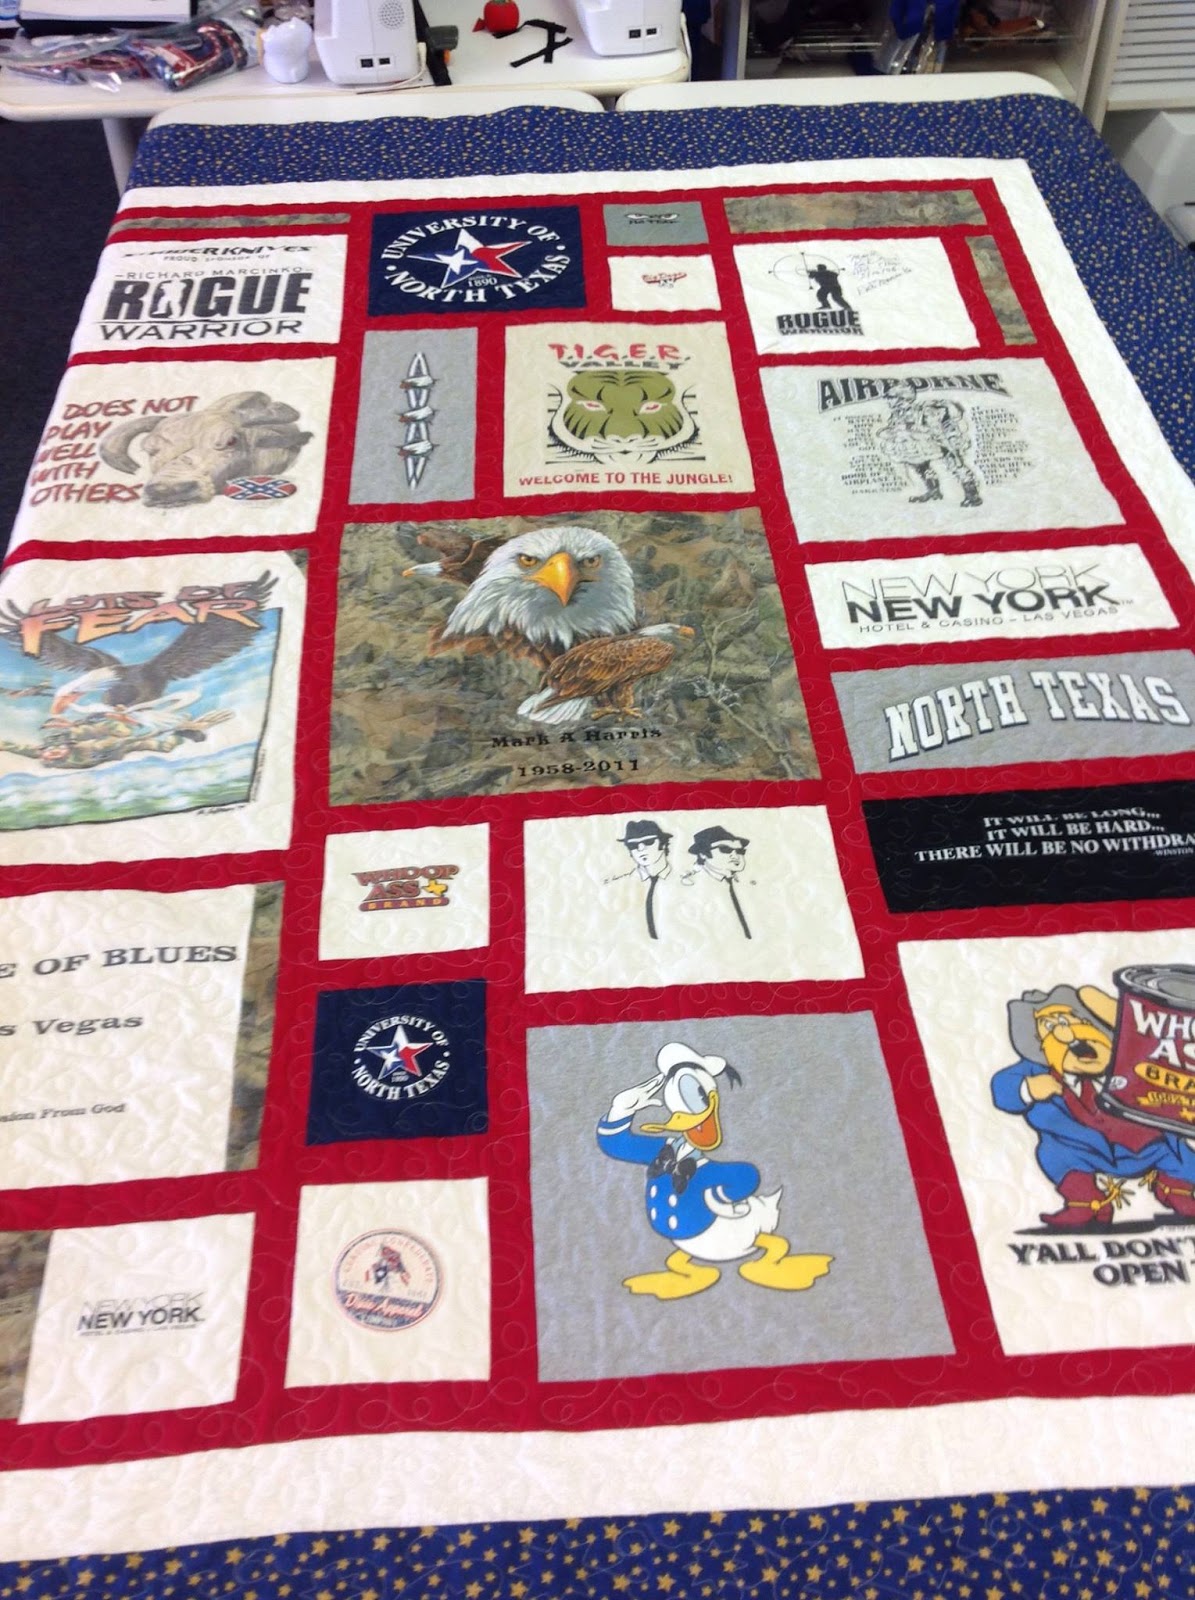
Here is the t-shirt quilt I made for my daughter.  The shirts were her Dads.  Newer readers may not know that he passed just a little over 4 years ago.  So this is also a memory quilt for her.  I asked my son if he wanted one too but he declined.  I think now that has seen this one he may change his mind.

Jackie at Wattafind quilted it for me.  If you look closley at the bottom of the eagle block you will see that she also embroidered it for me too.  It has his name and year of birth and death. 


This quilt is a very good representation of him.  His interests and accomplishments are all represented here.  You will see more t-shirt quilts from me in the future.


Thursday, August 06, 2015

Quilt Arm

I got a call from my boyfriend, who is working on an out of town job, the other day.  He told me about a lady selling fabric for $3 a yard and then he told me about a lady selling her quilt arm (he can’t remember long arm) for $6,500.  He encouraged me to call both gals and find out what the deal was as I would be visiting him soon and in these ladies vicinity.

I called the $3 fabric gal and got her story and made arrangements to go see her wares.  I did make a buy there.  Of course after I stopped myself she told me there was more fabric in the back.  Of course I had to look and found a little piece that I liked and added that to my stack.  If she had shown me these treasures first I am sure I would have bought lots of that and less of the other.  I told her when pay day rolled around I would probably be back to see her.  We will see.

I called the long arm owner to find out what she had and what was included in her offer.  Handiquilter Avante 18.  Once I had those answers I began researching the value of her machine, etc.  My biggest concerns were first moving a 12’ table and then placing a 12’ table in my home.  I didn’t value the thought of setting up the machine on my own only to struggle with getting everything to work properly.  I marked off a tape outline of how big the footprint of the setup was in my dining room.  After my mind calmed down at the thought of this monstrosity I measured out the height of the table and then the machine on top of that.  I have even begun thinking about where else I could put this thing.  In the process of my research I had a sales rep offer me her Avante for $900 more and she would set it up in my home and train me on it.  I think my issue is size.  Too big.
Let’s assume I can put this machine in my home and get it setup and can get past its size there is the issue that I really do not free motion quilt on my little domestic machine.  I have done some.  It isn’t that I don’t want to learn it is just that I hate mushing my quilt through the little throat space.  I have thought I need to do some small art pieces to get more practice.  I just have not.  Do I want to spend this much in hopes that I might learn one day?


I subscribe to a newsletter for estate sales.  Just this morning I found an estate sale titled “A Quilters Dream”.  Of course I had to investigate.  A room dedicated to fabric.  Bins of fabrics throughout the house.  Quilts. Quilt tops. Quilt Books.  You name it, they have it.  Then I spotted a frame quilting setup.  The pictures are not good enough to tell what exactly she has but based on some of the descriptions it looks like a Janome 1600 on a Little Grace II frame with a stitch regulator.  I have an idea of the value and I am planning to go have a look when the sale first opens.  It is a smaller setup and based on a new frame I saw online it can be setup as a crib or a Queen.  In the picture it looks like  crib size but even as a Queen it isn’t quite as big as that 12’ table.  On the newer tables the frame can be folded down.  Not sure I can do that with this one but it may be an option.  My thinking is that with this setup it takes up a lot less room and the investment will be a lot smaller.   When I think about having this setup I do not think of it as a monstrosity. 


Stay tuned.  I may be a quilt arm owner tomorrow.


Tuesday, August 04, 2015

A Lovely Year of Finishes

I need to get my daughters quilt bound and A Lovely Year of Finishes is just the motivation I need to accomplish that.  The red binding is machined on.  Now to get the rest hand tacked down to the back.


Do you have something you would like to finish this month and possibly win prizes?  Join us at the linky party shared above!

Tuesday, July 28, 2015

Texas Row by Row Experience

I collected rows from many different shops and continue to collect them for the Row by Row Experience.  This challenge started June 21st and I started a new job June 22nd.  The combination of me being at the office 10 hours a day and then rushing to my sewing room to get my rows complete so that I could be one of the first to turn in a completed quilt kept me from blogging.

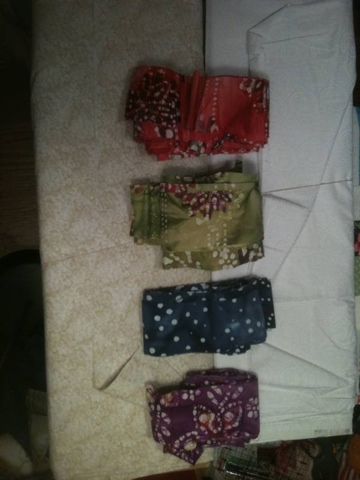
I finished and turned in my quilt 2 weeks ago at Thomas' Sewing Center in Mesquite.  The prize was 25 FQs and a $25 gift certificate for using their row.  Because they do not  have FQs pre-cut I got a few yard cuts and the rest in half yard cuts.  All batiks.  They are shown below.

I put this together as minimally as possible because I plan to take it apart and finish the rows into wall hangings for my office.  I will get more enjoyment out of them this way.  For now I will enjoy it as it is.  I have to locate the fabric I want to use as borders for each wall hanging so I am in no rush.


In other quilty news.  I have hired a college girl to come over and help me with my organizing.  I needed someone that could help me move furniture around and help tidy as we went without commentary and complaining.  She has been over for 2 - 2 hour sessions so far and we have made a big impact.  I continue to to tidy on my own and can't help but smile when I want to put something away and know where it belongs.  By trying to work away at the mess in small bites of time I actually accomplish more because I do not get overwhelmed.  I make lists and then we work on that list until time is up or the list is complete.  Progress!

More to talk about but I will save it for another post.

Monday, June 15, 2015

Design Wall Monday - June 15, 2015

More Dizzy!  By the pattern all the blocks would look like the green block and in that same position.  I mirror imaged two blocks and flipped two upside down.  The top and bottom pairs will be sewn together then a border of the background fabric on the top and bottom.  There is a wider sashing piece that will go between the pairs also from the background fabric.


I am not going back with the seam ripper but if I did it again I would switch the purple and green.  But due to the mirror imaging it's not that easy.  This is made from 2.5" strips but I would like to play with it on a smaller scale.

Hop over to Patchworktimes to see what everyone else has on their design wall.

Saturday, June 13, 2015

Dizzy


I bought the pattern Dizzy by Tiny Seamstress Designs back in March or April. I had passively been thinking about what colors I wanted to use.  I recently went on a shopping excursion to buy some neutrals.  When I got home with my purchases I auditioned the Stripz jelly roll and chose a background.  Above is the first block.  I'm planning to tweak the pattern just a little.

I have all my blocks made for Avignon Picnic.  I might play with the layout tomorrow and start assembling that top.  Will see what catches my attention tomorrow.

Thursday, June 11, 2015

Progress This Week


I have the center of the denim quilt assembled.  I have the border and backing chosen.  Need to do some cutting.  The backing needs to be expanded.  Undecided on how that will be accomplished.  Pictures once it's bordered.

Here is a block from Avignon Picnic.  Click the link for a full picture.  I have since picked this apart, into halves, because I didn't like the pink and brown all smoothed together.  My picture is turned sideways.  I am NOT enjoying assembling these blocks.  I think it's because I want thing spread out well and do not want them all to be the same.


I sat down with my iPad and wrote down all the possible combinations.  Do you know how to determine how many unique combinations you'll get?  I have 4 units that I want to be uniquely placed in the block.  I can use any of the 4 for the first position.  Then for the second position that leaves 3 choices, 2 for the third position then 1 for the fourth position.  This results in 4 x 3 x 2 x 1 or 24 unique combinations.  I am planning to make a 3x4 layout that will require 24 blocks. Hey, that worked out great.

Shown here are my units and my list of possible combinations.  Once I sew them together I will check them off.  Decisions removed.  I'm ready to sew it together now!


Not shown here is a big hunk of gray, a big hunk of yellow and a little gray floral.  This is heading to be a very modern looking baby quilt.  It is inspired by a pillow I found on Pinterest.  I just have to write down the measurements I need.  Pictures coming soon.

Here are some fabrics I pulled from a Stripz jelly roll.  I found mine at Walmart but I think JoAnns Fabrics carried them as well. In fact I think the jelly roll I used for Avignon Picnic was also a Stripz jelly roll.  I was auditioning the strips I chose with three different neutrals for the background.  I was really leaning toward the white which has a circle/swirl of white dots.  I just bought another neutral and it has a more dominant circle pattern to it.  I think that's the winner.  I am going to make Dizzy by Tiny Seamstress Designs.  I already plan to slightly alter the layout.  Typically I am a Prewasher but since the jelly roll won't be washed I'll skip that step for this one.

More to come.


Sunday, June 07, 2015

Design a wall Monday -June 8, 2015

Some time ago I pulled out a jelly roll that was languishing in my sewing room.  There may even be two here.  One from my stash and one from my mothers.  I had seen a video from Missouri Star Quilt Company.  They had you sew 4 strips together then cut squares from the strip set then cut those on the diagonal and put them together.  I made one block and thought what a muddled mess.  I like the colors well enough but there is not enough contrast for my eye.  

This project has been sitting and sitting.  When I tidied my sewing room I put it in its own project box.  As I topped other projects I began thinking about what's next.  This one bubbled to the top enough for me to want to unpick all the strips.  That in itself took 5 or 6 hours.  I pressed and sorted them all and started searching jelly roll patterns.  I found several but decided on Avignon Picnic at Moda Bake Shop.


The pattern doesn't really say how many strips are needed.  I pulled a neutral from my stash and cut as many strips from it as I could.  I also pulled a blue from my stash to brighten things up a little.  Below is a practice layout.  The brown blends in with my ironing pad.  I think it will look good.  Better than the blob in the top picture!


Another project that I resurrected was this denim and flannel project.  I bought 4 100% cotton shirts from a garage sale just because.  That spurred me on to get this quilt top together.  My boyfriend also had a flannel shirt that somehow got bleach on it.  That and the garage sale finds all got cut up and used.  I had already made 18 blocks.  I had a pair of jeans already set aside.  I cut those up and went and snagged another pair from my boyfriends closet.  They were a pair that I gave to him at least two years ago and he never wore them.  They were patched and intended for him to work in.  It's ok.  They are perfect in this top!  63 blocks in a 7 x 9 layout.

I have the first two rows assembled and intend to get more of them done today (Sunday).  Then I have to decide on a border.  It will be just a small one to stabilize the denim against the flannel and shirtings.  I'll post again when these are nearer the top stage..


Head on over to Judy's to see what others have on their design walls.

Thursday, May 28, 2015

Matchstick Marimba


While I contemplate next steps on my Pfefferneuse quilt I decided to work on this quilt.  It's from the book Allegro by Atkinsons Designs and is called Matchstick Marimba.

I had cut out the majority of this quilt back in 2010 or 2011.  Three of the six rows were pieced.  I sewed the other three together last night then assembled them into the top you see here.i have to add another row at the top and bottom to finish off the checkerboard pattern.


\


Tuesday, May 26, 2015

Decision Point

The blocks all around the outside edges are intended for the outside border.  My original thought was to put a double border between the whole and half blocks.  The intention was to make it appear that you are looking down into a glass jar and the borders represent the mouth of the jar.  One border would be a grayish black color and the other a blackish/whitish stripe.

When I laid it out I didn't expect to love the nice clean look of the quilt just as it is.  I would only have to put a quarter of a pinwheel in the corner or piece smaller pinwheels for those corners.

I'm going to move onto another quilt while I entertain everyone's input.  When you look at my quilt think about those spearmint starlight candies.  That was my inspiration for the green pinwheels.

Input please!


Monday, May 25, 2015

One of These Things is Not Like the Others

Unfortunately it is the only one sewn correctly in this pic.  Three sets of twosies out of 24 isn't too bad. I quickly corrected them and made foursies.  Sadly 5 of 12 of those sets were sewn wrong.  I forgot it made a difference at that stage.  They are all unpicked and ready to be sewn again.  

I hope to be showing the sewn center of the quilt tomorrow.


Saturday, May 23, 2015

Chalk Outline at a Crime Scene?

Nope.  It's just me being silly.  I laid out my pieced border.  More designing will be needed after I get the center and the inner border done.  What I have planned will not have those corners touching as shown in the picture.

Intrigued?  Stay tuned!

I hope you get to play this weekend.  Take pause to remember our fallen soldiers.


Thursday, May 21, 2015

Pinwheel Progress

All the pinwheels are made.  A plan has been hatched.  Need 12 of these units.  Next step is to work on my pieced outer border using the components from the blocks shown here.  I'd like to get this topped right away but I'm not sure I have the fabric I need for the inner border.  Darn.  I have to fabric shop!